Ruby Blooms

Showing posts with label series. Show all posts

Wednesday, April 13, 2016

Scrapbook Blessings Club Monthly Challenge: April


Hi! Today I am entering a challenge from Scrapbook Blessings Club for April. This type of challenge is a great way to give your creativity a direction especially if you find yourself a little stumped for what to do next. The challenges I have been participating in have truly made an impact on how often I am creating. Sometimes with too many choices I get overwhelmed and then don't do anything but with the help of the challenges I have some direction. I love that the challenge for this month is to make a card or a layout with a BIRTHDAY THEME, you can never have too many birthday cards!
Supplies:
  • image is C.C. Designs "Birthday Twila"
  • the background paper is Birthday Extravaganza with Glitter from The Paper Studio
  • sequins are from my stash
  • ribbon is from my stash (which I have had for over three years now-gasp!)
  • colored image with Copic Sketch markers
  • used Wink of Stella in clear to add some sparkle
  • used Glossy Accents on her shoes
  • used Signo White Pen to create the polka dots on her bows and dress

This challenge has a bit of a twist as they aren't asking you to link it up to their blog but add it to their FaceBook group which I think is a great idea and a fun way to let friends and family possibly see your creation as well if you choose to share it with them. The challenge doesn't end until the end of the month so you have plenty of time to play along, so go get your creativity on!!! You can click on Scrapbook Blessings Club and you will be taken to their FaceBook group to enter.

Thank you so much for joining me today and I invite you to come back whenever you can!

Wishing you sunshine and smiles,
Kim :)

Wednesday, March 2, 2016

Birthday Series 2016 #3

Hi everybody!

I hope you are all having a fabulous day! The card I am showing you today was a bit of a challenge to me. I truly love the technique of masking an image and stamping on top of it so that when you remove the mask you have created an entirely new image. I also very much enjoy masking an image and using distress inks to create a background around said image and find peeling off the mask to reveal the unblemished stamped image highly satisfying!

All that being said...I get the steps backwards. Every. Time. I don't understand the disconnect with my brain or why I pretty much have to make a few trial runs before I get it right because I do this technique rather frequently. I tell you all this to give you hope and help you to not give up even if you do waste a little paper along the way.

I discovered Newton's Nook a few years ago but this is the first purchase I have made from Newton's Nook. I am smitten with this kitty cat!!! Newton's Nook had a great sale on Black Friday or Cyber Monday (I can't remember) so I jumped at the chance to grab some of the stamp sets I have been drooling over.

Let's get into it...I stamped the image of the cat clinging to the balloon and then went to add the party hat...that was the first time.

The hat looks like it is floating about the cat's head

I started again and that was the second attempt...
The hat STILL doesn't look the way I want it


At this point in time as I am working on this card I begin to ask myself "should I just let this go? Maybe masking isn't for me..." and then immediately think "No, I am not giving up I really love this technique!" I kept working at it and finally got the masking down in the right order. In the past when watching other card makers doing this technique I remember someone saying "always work back to front" as in reference to what you want to see of the scene you are creating. I hate that even though I knew that helpful hint it still took me FIVE attempts to get it right. It was totally worth it!


FINALLY! SUCCESS! I was so happy and proud and couldn't wait to tell the world that I had figured out how to mask! (Seriously it is super easy, I don't know why I make it so difficult, I think it just means I need to use this technique more frequently.)

Here are the steps:
  1. stamp the image you want to see in it's entirety first
  2. mask off the first image you stamped
  3. stamp the next image, for this scene I was only working with two images so it really simple
  4. now mask off both images 
  5. add your background colors, I used distress inks to create the sky and the grass colors
  6. peel off masking and color your image!
Ingredients for this card:
  • Newton's Birthday Bash stamp set
  • MFT Hybrid Ink Black Licorice stamp pad
  • Distress Ink Minis- grass: Mowed Lawn, Shabby Shutters  sky: Tumbled Glass, Broken China
  • Tim Holtz Distress Markers used to color image
This technique is perfect for a card that you know you need to mail since it's quite easy to make it a single layer card. Thank you so much for dropping by and I sure do hope that you give this technique a try.

Wishing you sunshine and smiles,
Kim :)

Friday, February 19, 2016

Birthday Card Series 2016 #2

Hey Everybody! 

This MFT stamp set is full of sweetness! The only images from the stamp set I used on this card were the little girl and the presents, there are so many more images to be used! This paper set is so adorable and I am happy to be using it and at the same time sad to be using it up. Do any of y'all ever experience this? I have been working really hard to not allow myself to horde any of my supplies anymore (the struggle may seem silly but it's real!) 


Ingredients:

  • patterned paper is from Bo Bunny The Avenues Collection
  • My Favorite Things stamp set Sweet Birthday Wishes
  • I used a brush tipped black marker to line the outer edges to give the images a more finished look
  • took a Wink of Stella brush pen and colored in the bows on the gifts and the bow in her hair as well as her shoes
  • used sequins and pearls from Bo Bunny The Avenues Collection Jewels
All the supplies I used to make this card I purchased from Scrapping For Less
 This is possibly the best of both worlds because it is super sweet with no regret involved!!!

Wishing you sunshine and smiles,
Kim :)

Wednesday, February 17, 2016

Birthday Card Series 2016 #1

Happy Birthday!

Well it's bound to be someone's birthday today so that's for them. For the rest of you I hope you are also having a fine day!
The Birthday Card is probably the type of card I make most often barring Christmas cards and I always seem to either be making them after the recipient's actual birthday or cutting it super close.

So this year I am on a mission to not only send out the cards I make for the birthday guys and gals in my life but to also make more than I need so that I can have a collection to pull from. This first card in the series had to have a little card surgery...turns out that I did not like the way the sentiment looked when I stamped it and I wasn't sure what to do about it. It wasn't horrible and I certainly could have left it as it was but it just kept bothering me! So I finally thought to take my purple Wink of Stella pen and go over the sentiment. I was so happy when it seemed to fix whatever it was about the sentiment that I didn't like.

I was halfway through fixing the sentiment when it hit me I should take a before picture or no one would have a clue what I was talking about...

The picture doesn't quite do it justice because you are not able to see the sparkle that the Wink of Stella pen added, also since it is a darker purple it is much easier to read.

I tell you all this as a friendly suggestion that if you find yourself pretty much finished with your card but still not happy with it try to fix it. Some of the cutest cards I've made were results of me trying to fix a mistake. Also I have found that if there is something about a card that just isn't working for me I for some reason cannot bring myself to give it away. I know I'm not being judged or critiqued for the cards I give to my friends and family but for some reason if it doesn't look right to me I just can't leave it alone.

Thankfully, it's just card making and not life and death worse case scenario you scrap it and start over! (Yeah I know that's the absolute worse case scenario, right?)

Wishing you sunshine and smiles,
Kim :)

Friday, February 12, 2016

Valentine Series 2016 Last Card!!!


Hey Sweeties!!!

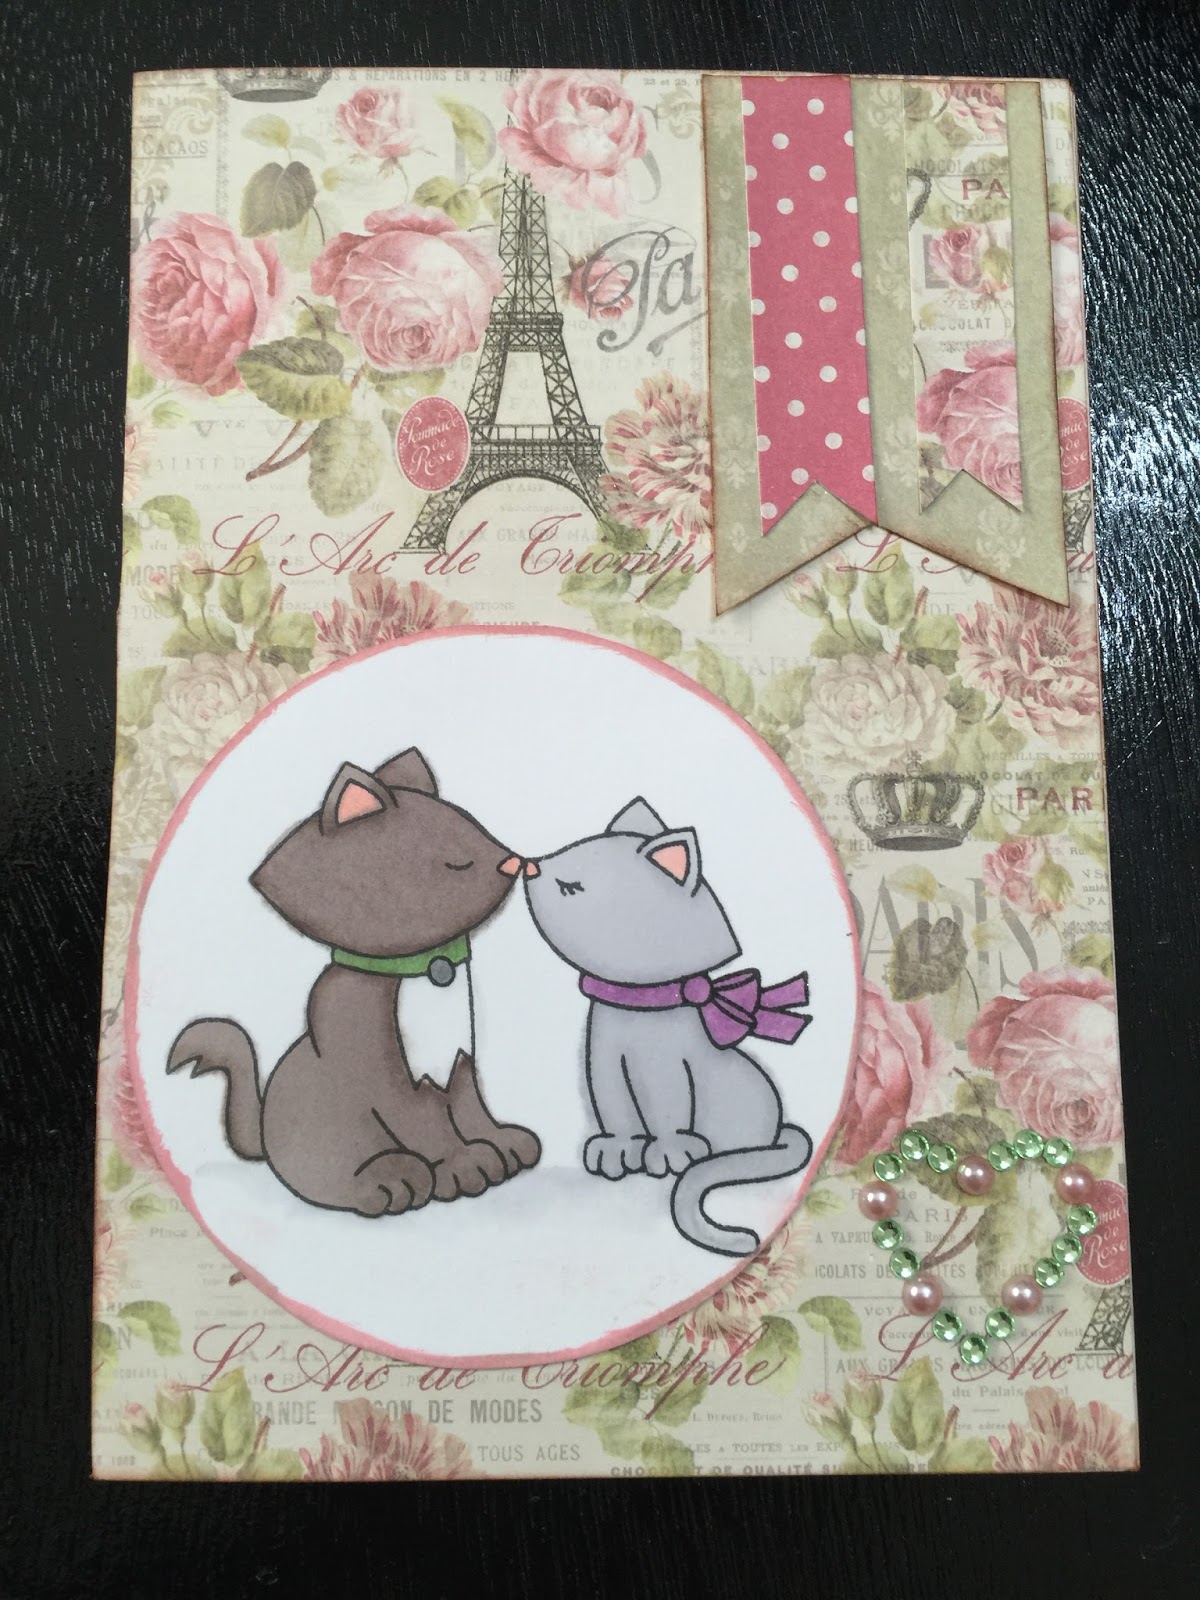
Well we made it! This is the last card of the Valentine Series for 2016 and I have had a great time making these cards! Originally when I began this series I only had a few people in mind that I planned on sending or giving a card for Valentine's Day. Jamie (the husband) and I recently made plans to have a game day (table top nerd gaming that is!) with one of our favorite couples. Turns out we will be getting together on Valentine's Day itself and I just could not resist making a card for them. Now I will say that this is the first time I have made a Valentine card for another couple but the image I used really seems to lend itself for this.

I was so very giddy when I realized that the image I wanted to use would look adorably cute on the paper pack that I have been itching to dig into. I tend to get very excited when I see an image I want to use and in my mind the entire card starts coming together all at once, even down to the finishing embellishments and that is exactly what happened with this card.


 INGREDIENTS:

  • stamp is from Simon Says Stamp Newton's Nook
  • all the papers used are from the 6x6 collection from Dovecraft
  • the heart bling in the corner I pieced together from pearls from BoBunny and from my stash 
  • colored wih copics
  • added some shimmer with Wink of Stella to the kitties' collars and to the Eiffel Tower that is on the background paper and the crown
  • stamped the image on the inside with My Favorite Things hybrid ink in bubblegum 
  • the little stickers on the inside are from a card kit I got from SFL
I am so grateful for those of you who have taken the time to read these entries. I hope you enjoy them and please keep stopping by whenever you are able to! Please feel free to leave a comment and even share what you are doing to celebrate Valentine's Day and the ones you love.

Wishing you sunshine and smiles,
Kim :)

Wednesday, February 10, 2016

Valentine Series 2016 #6


Hi ya!

I am excited to show the image I used on today's card. I borrowed this stamp from a friend over a year ago I believe (and am a little embarrassed to admit). I took it with me to Ireland and looked at it often always having the intention of making this card but didn't quite get to it. I brought it back home with me because I had the card I intended to use it on already in my head. It has been in my mind for quite some time and it feels great to get it out here into the real world!

This is for a friend of mine who LOVES tulips and I wanted to make a card for her with this image because I cannot look at it without thinking of her. Plus the little gal on the image looks to me like she is just bursting with joy to share all the tulips she has. I think the image lends itself to bright and happy colors and I really wanted it to have a cheery feeling.


Ingredients: 
  • image is from Penny Black and created by Mo Manning
  • the yellow and blue paper is from my stash
  • the red striped paper is from Echo Park 8x8 paper pad Dots & Stripes
  • I used Copic markers to color the image
  • Wink of Stella in clear to add some sparkle to the flowers and the vases
  • I stamped the sentiment on to a label created with a label punch from the Paper Studio
  • the sentiment is from Hampton Arts Jillibean Soup Handwritten Sentiments
  • stamped the sentiment using My Favorite Things hybrid ink in Wild Cherry
  • stamped the main image using My Favorite Things hybrid ink in Black Licorice
  • the paper the image is stamped on is Neenah Classic Crest Card in Solar White (this is the paper I bought in the UK and the sizing is different than in the States) 


I have made this card for one of my closest girlfriends and I look forward to giving it to her for Valentine's Day. There really isn't anything that lends this particular image to V-day itself but when I see this image I think of my friend and I thought it would be a perfect image to include on a card to let her know I love her and am thinking of her. So keep in mind that if you don't feel that you have a Valentine specific image that lends itself to be used for friends or family etc you don't have to! Just find an image that either makes you think of them or that you think they would enjoy seeing. The sentiment doesn't even have to be related to Valentine's Day you can always just write it on the inside. Either way I cannot imagine that they wouldn't be pleased to get a card from you and that it would certainly bring a smile to their face, we all like to know we are loved.

Oh! One more thing...it may not stand out to you and I realize that I may be pointing it out and ruining the image for you but it SCREAMS out to me when I look at the card but I have repeated the mantra that "handmade items are NOT perfect nor are they meant to be" (sigh) and I am okay now. I was coloring that tiny little piece of her scarf between her ear and her hair and my marker "burped", which means that too much ink came out and I FREAKED OUT!!! It went into her face and I thought the image was ruined and i had already colored all the flowers and vases and I was in shock! Then I calmed down, blotted the area with a paper towel and used my lightest skin color to move the yellow out of her face as much as I could. I think it is passable enough to still be used and given but I would be lying through my teeth if I said that my eyes don't go straight to that blemish as soon as I look at the card, I am however able to take in the entire image and I feel better about it. I mention this little incident to just encourage you that if you make a mistake or a mistake is made for you DON'T PANIC! There is usually a way to resolve it without trashing the card and starting over. :)

Thanks for joining me for a card and a bit of rambling!

Wishing you sunshine and smiles,
Kim :)

Wednesday, February 3, 2016

Valentine Series 2016 #5


Hello Everyone!!!

I bring a new cutie your way today and he was as much fun to color as he was to use on a card! While I was coloring this image I was thinking about musicians and how they have a reputation for people popular with the ladies. I find that to be true for me too...but to an extent. There are certain instruments that I find more attractive than others for example a saxophone is hot as is a guitar or even a piano but...the bongos? Bongos just don't do it for me. This image while not sexy in any way is stinkin' adorable!


Ingredients: 

  • card base from my stash
  • "lover boy" background paper from DCWV scrapbook kit in a stack Love & Wedding
  • grid paper from my stash (I think it was from a collection called Lost & Found from My Mind's Eye but not 100%)
  • image from La La Land Crafts Saxophone Luka
  • I cut out the wonky frame with My Favorite Things Blueprint 15
  • the wooden LOVE is from my stash and I used Smooches to color the wood
  • I had also used Smooches to color accents on the saxophone
  • I colored in the hearts with clear Wink of Stella to add some shimmer
  • Glossy Accents on his eyes 
Everything I used to make this card can be purchased from Scrapping For Less (keep in mind all items depend on availability such as paper packs etc.)

Friday, January 22, 2016

Valentine Series 2016 #2


So here is card number two. I received the kit that this stamp came in months ago and have being itching to color it. This little image is sooo cute and I figured with all the hearts on the image it would be perfect for a Valentine card.


The Ingredients:


  • card base
  • patterned paper from my stash
  • image from La La Land Club Kit
  • My Favorite Things Dienamics blueprints #15
  • Technique Tuesdays Fishtail Banners 
  • colored image with Copic markers
  • Wink of Stella on bow and heart on purse
  • Glossy Accents to apply to camera and eyes
This was such a fun card to make! I really love the hair on this image and all the hearts too she's cute and funky. 

Hope you enjoyed stopping by and look forward to seeing you all on Monday! 

Wishing you sunshine and smiles, 
Kim :) 


Wednesday, January 20, 2016

2016 Valentine's Series Begins!!!


Hi ya's!!!

The candy's been on the shelves for weeks now! I walked into the grocery store a couple of days ago and it was chocolates, stuffed animals, forever roses galore...so thus beggineth the Valentine Series!!! I am so excited! I love cutesy images, fun colors, hearts galore, and finding ways to use images that don't typically lend themselves to the holiday of focus and bending them to my will! (Bwahahahaha!!! Hmm I feel as though a holiday built around letting your loved ones know they are special should not bring out the villain laugh in me...oh well! )

The lovely little banner at the top of this post is brought to you by Teresa Russell (I am still working on acquiring such skills). She has been posting her Valentine Series since January 6th. You should definitely check it out over on her blog at Fresh and Renewed. Many thanks to Teresa for making this for us, I had to tweak my dates a little since I was still traveling through the first of the year.

So here we go!


I always use items that are in my stash, the majority of my supplies I order from Scrapping For Less which is a preorder site that Teresa runs on FaceBook. I am sure if you follow this blog for any length of time you will hear about it again and again. :)

The Ingredients:
  • textured cardstock
  • patterned paper from my stash (thought the hearts on grey were so cute)
  • image is from La La Land Crafts (I participate in the La La Land Club Kit it is absolutely worth it! )
  • used copic  markers to color the image
  • the sentiment is also from La La Land Crafts (is part of the same kit the image came it...told you it was worth it!)
  • the pearl spray is a Zva sticker
  • the little purple heart is a wood heart that I colored in with a purple Wink of Stella pen
I don't think the photo really shows it but on the buttons on the hat and on her eyes I added Glossy Accents. I also used a Uniball Signo white pen to color the white of her eyes.

 I put in links where I could just in case you see something you would like to add to your arsenal. I don't get any kickbacks or endorsement for any of the products they are what I happened to use while making the card. Thanks so much for stopping by!

Wishing you sunshine and smiles,
Kim :)

Wednesday, January 6, 2016

Whew!

I have been packing for two days (a little longer than that because I began packing things we don't use regularly but wanted to take home about a month ago)! I am super excited because we leave tomorrow to travel to Spain for a week for a one last holiday before returning to life back home.

As I just posted on Monday one of my goals this year is to blog consistently and I intend to achieve that goal. I had intended to begin my Valentine's Day card series but my dates are going to be a bit different than I had intended because of the move and the upcoming holiday. So instead I plan to change the content of what will be on the blog until I get back home.

So many bags for just two people! (We brought WAY too much!)


So there will be pictures of Spain coming your way! We have a lot of fun adventures planned for the next week and a couple of chill days to truly relax. I am hoping to get a massage at some point. For some reason whenever we move (even when it's a move I want to make) it tends to be stressful and my shoulders get super tight!!! So I am looking forward to a massage to work all that out.

I wanted to bring so many of the clothes that I have needed while in Dublin home to Florida. I got honest with myself as I packed and packed and packed and then realized I had not yet packed any clothes! So then I took a closer look at the things I wanted to bring back and if I didn't love it then it didn't get packed. Some of the things that I really do like didn't get packed because let's face it I live in Florida and there is just no reason for me to bring back a bunch of things I would only get to wear maybe once a year.

This little crew is getting left behind as well :(  So sad but I probably would not have been able to use them as door stops at home anyway because our dog Cookie would think they were her new buddies and I would probably find them in her crate! Ha ha! 

I would still love to be able to pack the duvet in our guest room and Jamie is still going to help me see if we can purge a little more so we can get it in but I'm not holding my breath. Good thing I wasn't holding my breath I would have come to on the floor! There's just no room for it boo! 

I love this duvet the flowers make me so happy! 

Even though I will not be featuring my Valentine's Day series until Wednesday January 20th I don't want to leave you without some inspiration so I am going to send you over to one of my favorite gal pals Teresa so you can see what she's been up to! Head over to freshandrenewed.blogspot.com for some inspiration!