Ruby Blooms

Friday, December 23, 2016

2016 Holidy Series #13


Hello! We made it! Today is  the final post of this year's Holiday Series!

Here it is the last card of the series with this fun image from Avery Elle which I colored with my Copic Markers. I colored the bulbs on the tree with Smooch colors and heat embossed the sentiment with red embossing powder. I also covered the car windows with Glossy Accents to give it a more realistic look. I used an EK Success punch to get the label that I put the sentiment on I thought the white background kept the sentiment from getting lost among the trees on the paper.

Fresh an Renewed is a great place for more inspiration so if you are looking for more cards that is a good blog to check out.

Scrapping For Less is my favorite store, there are two parts to this store 1. the FaceBook Group where we can all order just released items, and 2. the website scrappingforless.com where the inventory is already in from the suppliers and is available 24 hours a day, 7 days a week and purchases ship next business day.

Both are great and I shop at both, often grabbing something I couldn't make my mind up about before the pre-order or something that I wished I had gotten more of like sequins, or stickers, etc. Definitely give them a look because the prices, the quality of the items and the customer service cannot be beat!

Thank you so much for joining me on this little journey, I wish you a Merry Christmas, a Happy Hanukkah, Happy Kwanzaa, whatever Holiday you find yourself celebrating this year I hope you are surrounded by friends and/or family and mostly love.

See you next year!!! 

Wishing you sunshine and smiles,
Kim :)

Wednesday, December 21, 2016

2016 Holiday Series #12


Hi Again!

I am back today with card #12 and we are just THREE days before Christmas! Who better to celebrate with than Rudolph and Santa? This little image is from Wild Rose Studios (another of my faves) and they are positioned on top of a background that I created using the method that Stacy taught me. (I linked to her video of how to do that method in my last post so feel free to go back and watch, it was great! ) The "Happy Holidays" is a die cut from Gina Marie Designs she has terrific dies and there are quite a few still available on scrappingforless.com, the prices are amazing!

It's funny I recognize the paper from Doodlebug but I do not remember which collection because it was no long bound in the 6x6 paper pad. I used my Copic Markers to color the image and added Stickles in Frosted Lace to Santa's hat, cuffs, and top. I blinged up Rudolph's scarf with Spectrum Noir clear Sparkle marker and also added Glossy Accents to his red nose so that it would have a glossy wet appearance. (I have met reindeer however I cannot recall if their noses were wet but I do remember their antlers were fuzzy, but hey we are far from realty in this image so I'm not gonna sweat it.)

Please note that the snowflake paper is NOT part of the card just a background I was trying out for the picture.

My friend Teresa has also been making Christmas cards and has shared some of hers over at Fresh and Renewed so feel free to go get some inspiration or just go look at some cute cards.

As always I am going to give a shameless plug for Scrapping For Less FaceBook Group (a pre-order group for brand new scrapbooking and paper crafting supplies like the new Lawn Fawn release that was announced last Wednesday). Also for scrappingforless.com which is a great way to pick up some items and not have to wait for them to be ordered and delivered as they are already in stock and ship next day!

Thank you so much for stopping by and taking a look at my creation today. I hope you are having a fabulous day!

Wishing you Sunshine and Smiles,
Kim :)

Monday, December 19, 2016

2016 Holiday Series #11

Helloooo!

I am so excited to share card #11 with you today! This sweet little stamp is from Penny Black "Snow Kiss" it is a wood block with red rubber stamp. I decided I wanted to use my Kuretake Clean Color Real Brush Watercolour Brush Pens to create the background. These pens blend beautifully with each other and you can go back over them if you wish or you can even use water to give them a more washed out look or leave them more vibrant which is what I did with these pens. I also used the same pens to color the images and then finished off the card by going over the entire sky with a Spectrum Noir Clear Sparkle brush marker.

I held my breath as I stamped the sentiment in VersaMark and heat embossed it with white detail embossing powder. 


I am usually readily willing to part with the cards I make because hey that's the point but this one will have to go to someone who will truly appreciate it because I just LOVE the way it turned out and creating it was such a joy!

Do you enjoy looking at Christmas cards? Look no further, you can head on over to Fresh and Renewed where my friend Teresa is doing her Holiday Series as well.

My favorite store is Scrapping For Less, a FaceBook pre-order group where you can get "hot trendy scrapbook supplies at less than retail prices". I mainly focus on making cards and this is where I order my supplies. I also shop at scrappingforless.com where the "leftover" items from the pre-orders are placed so that those of us who are looking for something that is in stock and can be sent immediately can get that order placed and shipped to us the next day.

Thank you for joining me today and I hope you are enjoying this series.

Wishing you sunshine and smiles,
Kim :)


Friday, December 16, 2016

2016 Holiday Series #10


Happy Friday!

Today's card features one of the best Santa stamps I have. I am rather picky when it comes to my Santas because I like them to look friendly and jolly. The method I used for the background was taught to be by my friend Stacy of Craft-a-holic Momma. It is a great way to use 6x6 pads but I applied to my stash of left over papers that I had from multiple pads over the years. Here is a video that Stacy has made if you would like to give it a go.

The Santa face stamp is from American Crafts Shimelle Christmas Magic collection and I colored him using my Copic Sketch Markers. The Merry Christmas is from SSS (I can almost pick out Kristina Werner's handwriting anywhere now). I used my Spectrum Noir Clear Sparkle marker to add shimmer to the die cut words and to Santa's hat. 


My friend Teresa at Fresh and Renewed also has some Christmas card inspiration over on her blog so if you are hunting for ideas visit her as well! Teresa is also the owner of scrappingforless.com where I get all of my hot trendy items for less than retail prices so feel free to go to the website to grab a great deal or if you want to get in on the ordering as things come hot off the presses head over to the Scrapping For Less FaceBook Group and ask to join. The welcome letter will explain how that group works. 

Thank you so much for stopping by and hope you get out there and have a great weekend making memories with your loved ones!!!

Wishing you sunshine and smiles,
Kim :)

Thursday, December 15, 2016

Lawn Fawn Release Blog Hop

https://www.scrappingforless.com/blog

Hello, fellow Lawn Fawn lovers! Today is the December release of Lawn Fawn! Oh, how we wish there were more of these! I absolutely adore Lawn Fawn just as much as all of the team! You will see all their great projects...hopping along! Our focus today is on the Facebook Scrapping for Less pre-order group. This is where you can pre-order many many items and where you will find new releases of certain companies..like Lawn Fawn, Avery Elle, Stamping Bella to name a few! Check out the new Lawn Fawn album where you can order all the new products...this order will be placed around Dec. 28th. There are also many Lawn Fawn items available on the website stamps and dies
 both

On the Facebook group you will only find the brand new Lawn Fawn release items, however, should you want to order anything else Lawn Fawn related just ask (either send Teresa a PM or email) and she will check to see if she can order it! 

Also, if you are not a current member of the Facebook group just ask to join and we will get you added super quick!

Of course, a blog hop isn't a hop without some blog candy! So, if you leave some love on each and every blog you will be entered in a drawing to receive the following brand new Lawn Fawn stamp! 

https://www.scrappingforless.com/blog

Hi All! 
Kim here from Sunshine, Smiles, and Cards with what I came up with to celebrate the Lawn Fawn Blog Hop Release!

The distress inks below are what I used to create the sky, LF's Stitched Hillside die to create the snow and LF's "Winter Alpaca" stamp set. The snowflakes on the card are stamped in Versa Mark and heat embossed with white embossing powder.I cut the alpaca's scarf out of LF's "Perfectly Plaid Christmas"
These are the colors used to create the sky.
Your next stop is Stacy at Craft-A-holic Momma !

Don't forget to leave a comment on each blog to be entered to win the blog candy!!!

Blog Line Up:


Tuesday, December 13, 2016

2016 Holiday Series #9


Hi!

 I come to you today with card #9 which is turning out to be one of my favorites but it was incredibly easy to put together! I truly enjoy coloring images and sometimes I get so wrapped up in the stamps I want to use and color that I forget what adorable cards can be created without ever stamping an image. Which is exactly how this card was created.

Doodlebug Design is one of my favorite companies, I rarely find myself not wanting every single thing they release. Everything on this card is by Doodlebug Design from the paper I used to the doodle pop deer, snowflakes, heart and even the sentiment came from Doodlebug.


I chose the different patterned papers because even though they are different they all complement each other. I cut a circle out of plain white paper so that the deer would be seen more easily. I also stood them at the same level as the diagonal striped paper to ground them, I didn't want them to look like they were floating in the white ball. Inside the 6x6 paper pad I used (which I know was from last year because it was in my stash it might even be from the year before) there are little squares with sentiments on them and when I saw the above sentiment it was perfect.

This is a very simple finish to the inside of the card but it is just enough to pull the whole card together and give enough room for a sentiment inside if I want and/or a personal message. I tend to do both for Christmas cards because writing out Merry Christmas brings on hand cramps rather quickly! 

This card was simple and sweet to make and a fun change from my norm. All my supplies were purchased from Scrapping For Less and if you love Doodlebug Design as much as I do I suggest you head to FaceBook to join the pre-order group and also take a look at scrappingforless.com because there are some really great Doodlebug items currently available on the website.

Also don't forget to check out Fresh and Renewed for more Holiday inspiration! 

Thank you so much for spending some time with me and I hope your come back to visit again very soon!!

Wishing you sunshine and smiles,
Kim :) 

Monday, December 12, 2016

2016 Holiday Series #8


Helloooo! I am so excited to share this card with you! I had an idea and I was so relieved when it turned out well! I had been watching a video from Kristina Werner at kwernerdesign.com. In her video she was creating a background with distress inks and it turned out beautifully and I decided to try my hand at it. Once I did the background I decided I wanted to do an ombre look on her dress.

This is a La La Land Crafts stamp which I got from Scrapping For Less called "Christmas Angel Marci" The snowflakes are stickers that were in my stash.

I thought it would be a good idea to use one of the scrap pieces from the background paper which is from Bo Bunny and just put the small strip and snowflakes on the inside. I was happy with how it turned out. 


After I finished with her dress I took my Spectrum Noir clear marker and went over her entire dress and the sparkle is just shimmery and gorgeous! I wish it showed up as well on camera as it does in real life. All of these items except for what I pulled from my stash I got from Scrapping For Less.

If you are looking for a great store with terrific prices I have two different options for you:
  1. Scrapping For Less FaceBook group where you have the option to go through the photo albums and choose products that are not yet released or haven't been ordered yet. You claim the items that you want, Teresa sends you an invoice, you pay the invoice and when the order comes in she ships it to you. 
  2.  scrappingforless.com is where you go online and shop all the items are in stock and the website even shows you the quantity still available. You fill your cart with what you want, check out and pay with credit card or PayPal, your order is filled and ships the next day! 
Don't feel like you have to choose one or the other most customers shop at both because it never fails you receive something you ordered and then wish you had ordered more and that is where the website comes in or if you are like me I get excited about new stuff and then I think "Oh no I'm almost out adhesive" and then I find myself checking out the website to grab essentials.

All Christmas items are on sale right now so don't hesitate to finish up your shopping for anyone on your list who loves to create! There is plenty of time to have it before Christmas Day if you are wanting to give it as a gift.

Thank you so much for stopping by I hope you are enjoying this Holiday season and are spending a little extra time with those you love.

Wishing you sunshine and smiles,
Kim :) 

Friday, December 9, 2016

2016 Holiday Series #7


Happy Friday!!! 


I am back with card #7!  There is an artist out there and I have written about her before but this image is also one her creations. The image is called "Christmas Kiss" and the artist is Mo Manning, she is also an illustrator. This image is large, beautiful and fun to color with various mediums. This go round I chose to watercolor. 

For the background I used a stencil from MFT and Bo Bunny's glitter paste in gold. If you have never used glitter paste just make sure that you tape down your stencil so that the paste won't slip underneath, use a firm spatula and clean your spatula and stencil up with warm water immediately after using it. You can also use a soft bristle brush to remove the paste. Pull your tape up gently so as not to tear your paper, I haven't used it yet myself but many others that I follow have mentioned great success using micropore tape.

I stamped this out onto Strathmore watercolor paper in Versafine ink because it's waterproof and then I Gansai Tambi watercolors to color the image. I didn't go over it with the sparkle I typically use because I didn't want to ruin it since I had used watercolor. 
I did a second generation stamp on the inside and I forgot to mention that on the inside and the outside I used Smooches in Gold and went around the edge of the paper.

Keep in mind that this card is 6x6 so it is rather large and I will also be making my own envelope because I don't typically make cards this large so I don't keep a supply of such large envelopes but hey, that's why I invested in We R Memory Keepers' envelope punch board.

All of these materials I acquired through Scrapping For Less, if you are looking to replenish your supplies or want to try a few new items head on over to scrappingforless.com for great items at terrific prices! Oh and all Christmas items are currently on sale!  For more inspiration you should check out Fresh and Renewed by Teresa Russell.

Thank you so much for stopping by and I hope you have a fantastic weekend! Get out there and make some memories!

Wishing you sunshine and smiles,
Kim :)

Wednesday, December 7, 2016

2016 Holiday Series #6

Hi ya!

So here we are only 17 days until Christmas Day! It still seems like it's a good distance away but now I'm thinking I better get my Christmas postage stamps ordered!!! Card #6 has to be one of my favorite images ever! It is so sweet! The stamp is from Art Impressions "Twinkle in a Tangle", I colored the image with my Copic Sketch markers. I came back and hit the lights that Mr. and Mrs. Claus is wrapped in with my clear Wink of Stella.


I used a jumbo fishtail flag die for the striped paper and used my MFT blueprints #2 die to cut out the paper with the lights on it (by the way how perfect was that paper with that stamp right?). Then as a finishing touch I added the little enamel dots that are also very glittery but that doesn't show up in the picture so well.  On the inside I added the strip of string lights at the top, I started to put them on the bottom because that is typically where I add the inside decoration but being as the lights look like they are hanging it just looked wrong!

Don't forget to head over to Fresh and Renewed and see what card Teresa made for today and pick some different ideas.

Scrappingforless.com is having a sale on everything Christmas! Head on over to the website for some great deals!

Thank you so much for stopping by I sure hope you are enjoying the series and I would love to hear your comments! 

Wishing you sunshine and smiles,
Kim :)

Monday, December 5, 2016

2016 Holiday Series #5


Here's card #5! The background paper I used here was from my stash so I'm not sure the name of the collection. This little image is "Snowflake Garland Marci" from La La Land Crafts. The snowflakes in the corners are made with a Martha Stewart snowflake punch. I used Copic Sketch Markers to color the image.
 I carried the snowflakes on to the inside to give the card a more complete feeling. This card is a great Christmas card for a friend but is also versatile to use for winter cards as well.

If you are looking for some inspiration or just some pretty pictures of really cute cards check out Fresh and Renewed my friend, Teresa has some beautiful cards on her blog!

Looking for some great prices on any of the product types I've used in this series so far head on over to scrappingforless.com.

Thank you so much for spending a little time with me and please feel free to leave a comment!

Wishing you sunshine and smiles,
Kim :)

Friday, December 2, 2016

2016 Holiday Card Series: #4


Well Helloooo! 

So here we are moving right along to card #4, another image from Stamping Bella (told you I love them). I was concerned about cutting this one out but I really didn't want to do a scene or mask anything off I wanted to use the fun paper and have the sentiment on the outside so I focused on cutting her out with a small white space around her. I definitely had to take my time but I find "fussy cutting" (where you cut something out by hand) to be relaxing. My mind tends to wonder as I move my paper this way and that so that I get the cut I want.
Used Stamping Bella "Uptown Girl Posh has a Present", colored the image with my Copic Markers.
 The little label I put the sentiment on is a punch I have in my stash and thought it was the perfect size and nicely filled in some of the empty space on the front of the card.
I really liked the way the inside of the card looks with the sentiment stamped in the lower right hand corner. This way there is still a well wish on the inside but also plenty of room to write a personal message as well.
This stamp that I used today is from a while back however Stamping Bella did have a new release this year full of Holiday stamps that are just begging to be colored! Go check them out over at the Scrapping for Less FaceBook Group and there are still great products to be had if you are making your cards or if you just up and decide that you want to make something over at the website scrappingforless.com. With the items shipping out next day you are still in plenty of time to get creative whether you want to make cards or work on a project!

Additional inspiration is just a click away at Teresa's blog Fresh and Renewed where she is joining me in creating a Holiday card series on her blog too!

Thank you so much for joining me as I share my cards with you and a few thoughts. Please feel free to leave a comment below I would LOVE to hear from you!!!

Wishing you sunshine and smiles,
Kim :)

Wednesday, November 30, 2016

2016 Holiday Card Series: Card #3


Hi ya!

So let's talk about card #3...I enjoyed making it, Stamping Bella is ranked in the top 10 of my favorite stamping companies so I get pretty darn excited about most of their stamps. Most of the time when I am making cards I don't typically do the same card in mass production, unless I am making cards for a client. ( I find that unless I am getting paid for it repetition is not my friend.) I like the process of making cards and when I finish one card I feel like the slate has been wiped clean and the next one has the potential to be anything!

I also do something to the inside whether it be generation stamping (this is where you ink up your stamp & stamp it off onto scratch paper one or two times & then add the image which gives you a lighter image that can be written over & still easily read). Adding small stamped images in the bottom right hand corner such as snowflakes or one of the characters from the front of the card or adding some strips of paper that coordinate with the front as well. I feel this gives the card a finished feel while still allowing most of the inside to be a blank space for the giver to write their message.

On this particular card I chose to go with the strips of paper that match the front AND a stamped image on the inside. This is what I would like to talk about...typically when I create something and I am finished with it, I let it be. I enjoy it for what it is and remind myself that this craft is handmade and perfection is not the point and not to bash your own work. I'm gonna deviate from this little rule for just a sec...because I REALLY don't like the inside of this card!!!!
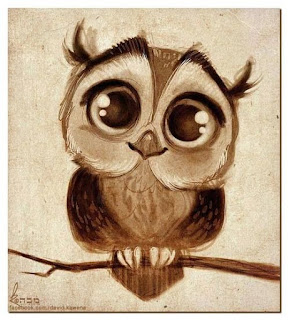
The stamp image is from Stamping Bella, the paper is from Doodlebug Designs, the ribbon is from my stash. I colored the image with my Copic Markers. I may still add some more sparkle to it, I am pretty sure that I added Wink of Stella in Clear but I think that Spectrum Noir Sparkle in Clear shows up so much better.

I don't normally cover up this much of the inside so that more a message can be written but when I was making this card I just love that sentiment and I was thinking that that sentiment says it all. Looking back I wish I had stopped with the center white piece, I like the image stamped in the middle and the sentiment it is the other two pieces of patterned paper that are distracting to me.

Ok that's all, thank you for allowing me to vent and I can now move on. Don't get me wrong overall I like the card and I WILL be giving it to someone for Christmas but I won't be putting this final touch on any future cards. I think for me this falls under the "sometimes more is just too much" category.

I share my thoughts on the inside of this card because I think it could be helpful to you should you see this and haven't yet made this same mistake it could be the thing that keeps you from making said mistake. OR if you have made this or any other creative choice that in the end you decide you wish you hadn't you won't feel the need to trash your creation but will be able to focus on what you do love about it realizing that "this is how we grow". (Insert best impression of an art teacher's voice here.) OR should you find yourself not making anything even though you think you would like to give it a go but don't want to disappoint yourself, LET YOURSELF PLAY! After all it's a card people! It's not going to the Smithsonian, it is not going to represent paper crafting in our time for the future generations. Truth be told it might not even survive the trash can before the calendar flips over to 2017. The best part you will most likely never know what happens to your creation once it leaves your hands and that is perfectly okay. No really it is.  :)

So create with abandon! Try new things, different things, odd things because this is how we figure out what we like and discover new things we like. My go to store for most of the items I use is a well loved FaceBook group Scrapping For Less where you can pre-order new released product and find the best prices on everything. Whether it is brand new items or essentials you won't find a better deal or better customer service. Can't stand to wait? You don't have to, just head over to scrappingforless.com where we have in stock items at fantastic prices and these items ship next day!

Looking for more inspiration? Head over to Fresh and Renewed and check out Teresa's Holiday Card Series!

Wishing you sunshine and smiles,
Kim :)

Monday, November 28, 2016

2016 Holiday Card Series: Card #2


Hi ya!

Here is card #2, it is a little wintry scene of adorable critters! It could have easily been a one layered card but the thought of doing all that masking made me want to abandon my craft room. I really do love the effects of masking but I have to be in the mood for that.

The masking that I did took me four tries, I repeat FOUR! I am not afraid of redoing something, in fact, I am quite a fan of it. If I do a technique or anything for that matter and it doesn't look right to me I can't let it go, I have to redo it. Thankfully the rest of the card went very smoothly even though I admittedly was holding my breath as stamped the paw prints in the snow.


I used the stamp set Joy to the Woods from Lawn Fawn and the die set as well to create this card. I also used Lawn Fawn's Stitched Hillside Borders to create my snowy hills.

I truly enjoy using distress inks and blending with them and the colors "tumbled glass" and "stormy sky" making what I think is the perfect winter sky. This card was fun to make and as it came together  I was happy, happy, happy! All the little critters came out to be adorable and when I embossed my sentiment with white detail embossing powder also dusted the squirrel it made me think the little guy had just popped out of a hill and the landing of the embossing powder couldn't have worked out better. The inside of the card stumped me for a bit because I didn't want to add any bulk to the card but then my eyes landed on the paw prints stamp and boom! I decided to add a final detail to the card and added dots with my white gel pen to create the look of falling snow. (More breath holding, I'm lucky I didn't pass out while making this card!)

On to the next, if you are interested in these types of products so that you can make your own cards or other paper crafts head on over to scrappingforless.com it is a great website with wonderful prices!

 Don't forget to check out Fresh and Renewed for some more inspiration!


Wishing you sunshine and smiles,
Kim :) 

Friday, November 25, 2016

2016 Holiday Card Series: Card #1


I hope you had a wonderful Thanksgiving and if you did any shopping I hope you found some great deals!!! I LOVE making cards and I feel like Christmas cards are so much! I will be sharing with you my Holiday Card Series beginning today and then continuing every Monday, Wednesday, and Friday through December 23rd.

Not only will I be sharing with you my creations but I will also link to my friend Teresa's blog at Fresh and Renewed. We hatched this idea together and even though we often made cards either on our own or while we were FaceTiming we have supporting each other on this goal of sharing these cards on our blogs.
Image is from Penny Black "Christmas with Mimi" used black card stock for the base, MFT Pierced Oval, Bo Bunny Glitter Paste in Wasabi on a chevron stencil. I used Marvy Uchida Snow Marker for the hats. Colored image with Copic Sketch Markers. Put Stickles on bow, used black Pearl Pen on eyes for a touch of gloss and Wink of Stella Brush Pen on hearts. The sentiment is from Crafter's Companion stamp set "Home for Christmas" which I heat embossed using Versamark Ink and WOW! detail embossing powder in white. 
 Don't forget the majority of my supplies I get from Scrapping For Less and there are two...count them TWO ways to order with Scrapping For Less. Pre-order recently released materials from the FaceBook Group Scrapping For Less or go to the website at scrappingforless.com to get in stock items shipped to you next day! Happy Creating!
I did a second generation stamp with the "Christmas with Mimi" Stamp so that I could write on top of it without it being difficult to read. 

So come with us and get in the Spirit of the Season whether you are looking for inspiration or just enjoy looking. I hope you make the most of the holidays with your loved ones and that you enjoy my cards as we head toward Christmas Day!


Wishing you sunshine and smiles,
Kim :) 

Friday, November 18, 2016

Go Take a Look and Get Your Own Newton's Nook!!!


https://www.scrappingforless.com/…/c1/Featured_Products.html


Welcome to Newton's Nook: Holiday Release @Scrapping for Less!

I am so excited to announce that ScrappingForLess.com is now carrying Newton's Nook!!! If you are new to Newton he is an adorable cat that has been the inspiration for some of the stamps over at Newton's Nook Designs. I love their stamps! They are high quality, fun to color and even more fun to create with.

The stamp set that I am working with is "Holiday Hounds" which is full of wonderful dachshunds! I don't have a wiener dog myself but I sure do love them. They are so very adorable and I do have several friends that have doxies in their lives. Which in my mind makes this stamp even more perfect for making Christmas cards and tags with these cute little critters.

So here is what I did with these little doxies:


By clicking here you can grab your own set!

 When the website opened we had a grand opening and one of the questions that Teresa (the owner of Scrapping For Less) asked everyone is "What other companies would you like to see on the website that I currently don't carry?"

Here is the beautiful and exciting part...Newton's Nook was one of the companies mentioned to her in answer to that question and now within a month of the website opening Newton's Nook is being added! It is so exciting to see something come into existence especially because a company LISTENED to the feedback of its customers! It is this type of customer service, the willingness to find out what her customers want to see and then to go out and make it happen for them that makes me so proud to be a part of Scrapping For Less FaceBook Group and now ScrappingForLess.com!


  Leave a comment on each blog and you will be entered into a random drawing for a product goodie! Also, since this release focuses on the holidays all of the Newton Nook offerings are from their holiday line up. So go take a look at this wonderful stamping company and see if you are able to look through the stamps and not find one that you just have to have, (for me I won't be able to stop at just one)!   ;)

Your next stop in this blog hop is
Stacy Tiedemann 


Here is the Line Up For the Blog Hop (so you make sure you got everyone to get entered for the drawing!)
Scrapping For Less Blog
Wishing you sunshine and smiles,
Kim :) 
 

Wednesday, November 16, 2016

How Did This Happen? AGAIN!

Happy Wednesday!!!


This is the mess I started with yesterday. I cannot count the times I have cleaned up, reorganized, moved around and redistributed the items in my craft room! I am very much an out of site out of mind person so if there are things that I want to use on a regular basis I need to have easy access to them.

I was beginning to feel boxed in and had been carving out a big enough space to make something for a few weeks by the time I reached my limit and could take it NO MORE! So it was time once again to re-evaluate where my stuff should live. (yeah, yeah I know they are inanimate objects, don't worry I'm not chatting them up) I want and need the things that I use constantly to be with in arm's length.

So that is what I did, and oh my goodness, organizing and finding new places where things will work better takes SO MUCH LONGER than just cleaning up! I'm sure I am telling you all something you already know. What I do want to share and the whole reason for this post is I am going to walk you through the questions I asked myself in order to determine where to put what.

I make cards 95% of the time so every time I looked at an item and needed to decide where it should live I asked myself the following:

  1.  Will I need to use this on every card I make? If the answer to that question was yes then that told me it needed to be within reach. Within reach meaning I don't have to get up from my craft desk and preferably that I don't have to open a drawer to get to it. (Think tape runner, scissors, paper trimmer, etc.)
  2. How often will I need to get to this item? Take my watercolor paints and brushes, I don't watercolor every time I make a card so even though I like to have them close by I am okay with them being in a drawer. 
  3. Will organizing this item in this manner also add to the decor of my room? I know this might seem weird but I tell you the site of my 8.5x11 cardstock paper all lined up by color makes me happy and look so pretty to me! 
  4. Do I keep forgetting to use this? I love sequins and I really love to see them used on my cards however if I don't keep my sequins in front of me then they don't get used. I forget about them entirely until I am admiring the card of someone else and think how great the sequins look on their card and then (forehead slap) think I have those why didn't I do that! 
  5. Is this item something that I want the option to use even if I don't use it constantly? Such as glitter, foil paper, those kinds of things. 
This is how I decide where to place things in my room. So after going through all those questions with every single item I laid my hands on I ended up with this...

 Now I'm ready to CREATE!!! :)

Wishing you sunshine and smiles,
Kim :)

Friday, November 11, 2016

Confessions of a Night Owl

Hi Everyone!
https://www.etsy.com/listing/243194526/baby-owl-cartoon-drawing-mouse-pad-cute

I am a night owl. I was raised as a night owl, my mother was a night owl. It is in my blood. She LOVED to play bingo and when she would come home late after a bingo game (typically around midnight) she would wake me up and we would go into the living room and have a snack while watching a television show (usually SOAP, Golden Girls, or Designing Women). That was very special to me.

I also hated going to bed, I always have, I don't want to miss anything! I remember staying up into the wee hours of the morning playing Mario Brothers on my Nintendo or watching movies like Look Who's Talking, or Steel Magnolias. I remember staying up all night long talking with my cousin when she came to visit and the house was quiet. Then as I got older and began to scrapbook then make cards I would go to crops and we would all be laughing and talking and creating and I would stay up until my eyelids just wouldn't obey me anymore. I loved it! Staying up late for me has always felt special, like you're stealing time. Even now around 10pm I hit a second wind and I want to DO something, make something, sometimes yeah, even clean something.

In reality my schedule isn't like that though. It can't be in order for me to be awake and present when I need to be and do the things I need to do on a daily basis. I am a stay at home wife by choice and I take on the responsibility of doing all the house stuff, all the food stuff, all the stuff I used to spend one of my weekend days doing to get ready for the work week and keep life moving along. I now do all of that while my husband is off at work so that when he is home our time together is just that- ours. While I love that benefit of being a housewife and my weekends no long feel robbed while having to adult for the upcoming week my creativity doesn't always willingly follow a schedule.

I guess this little chat will fall under "getting something off my chest" because I don't have an answer or a plan to change it. I am just acknowledging that even when I am dead tired because I have been up since 6:30 or 7 AM no lie, 10 or 11pm rolls around and I want to start a card or color an image. I typically refrain and go on to bed because I have tried staying up in the past only to sit in a tired stupor in front of what I am working on. Maybe I am just looking to commiserate if there are any you out there like me...A night owl, living the life of a morning person...not the attitude of a morning person mind you, but at least the schedule.

Wishing you sunshine and smiles,

Kim :)

Tuesday, November 1, 2016

Getting My Cards Up on FaceBook

Hello Everybody!

Ever find yourself intending to do something and you keep telling yourself that you will do it soon and then soon becomes later, later and later. That is the predicament I have found myself in recently. I tend to make more cards than I send and my stash keeps growing and growing. I have been meaning to put my cards on my FaceBook page for quite some time and I finally took the time to do it!


Here are a couple of the cards that I am adding to my FaceBook Page:


If you or anyone you know is looking for a card come take a look, you may find a card you are looking for or you may find inspiration, either way you are welcome to stop by! :)


Wishing you sunshine and smiles,
Kim :)

Thursday, October 20, 2016

In the Mood? A Card Maker's Dilemma!

Hi again!

I don't mean anything naughty by my post title, hope you aren't disappointed (cheeky grin). Any way what I'm talking about is being in the mood to create. When it comes to card making, crocheting, scrap booking, whatever the hobby may be I seem to have to wait for the mood to strike me. I am always curious to find out how the creativity of others works. Whether you are into baking, cooking, card marking, quilting, whatever it is you may like to do. Does it require that you feel like doing it?

One of the reasons this presents such a dilemma for me is because I want to do things that require consistency. Such as blogging for example or making YouTube videos, even being on a design team. All of these things are time sensitive and require working on a schedule with deadlines. I am striving to learn how to be creative not just when I feel like it but because I have set aside the time to do so.

I know how I am when I come across a blog or a YouTuber that I really enjoy and that can only be described as "content hungry". It is so easy to consume a ton of content that has taken the provider time to create. For me if I am following someone who is consistently putting up more content then I am more likely to read, watch, or listen to it. So knowing this about myself I can't help but think that if someone comes upon my blog or YouTube channel enjoys what they see but then realizes that they have no idea when more content is coming they may stop checking back at all. This is the reason that I am determined to find a way to be consistent.

If you struggle with this is well I would love to hear what methods you use to be creative even when you aren't in the mood. Do you do anything to get the creative juices flowing such as listen to music, watch YouTube videos, movies etc. I am employing a multitude of different strategies to find out what works for me. 

I have made this card and even took pictures as I went only to have still not created the blog post to talk about or share it!


Up to this point I have come up with the following plan of action to see if this helps me train myself to be creative when I have time for not just when I feel like it:

  • I schedule time with friends via Face Book or Google Hangouts with the purpose to create, we typically pick out a video, a card style (ie pop-out, gate-fold etc), or a technique to do during our time together. This has been MOST beneficial and a great way to develop and nurture those friendships as well.  (BONUS!)
  • I take advantage of any writing mojo I may come upon when I am writing up a blog post. I don't know about others but for me once I start writing and get in that mode I often find myself with more ideas about posts I would like to write and in the mood to do so. Therefore I go ahead and write it up thinking that I can always come back and edit, add pictures or whatever else I may need to do that post and that way I can work a little ahead. 
  • When I do sit down to create on my own I try to either watch YouTube videos of other people making cards, listen to a podcast, listen to music to get me pumped up, or watch a movie that I have already seen. (Watching movies I have never seen is a bad idea because then I stop creating and focus on the movie but this has also been known to happen when I watch movies I've already seen especially if I am not in the mood to create.) Hmm...I think I just nixed the movie idea
These are a few things I am trying and I will update as time goes on to let you know what I am finding works for me and what doesn't. As for now the jury is still out on the best way to stay motivated and create when I need to and not only when I feel like it. Thanks for "hearing me out" !

Wishing you sunshine and smiles,
Kim :)